


The Natural Life - Chapter 14 - Planting Seeds
The start of something great.

Hello Frens,
Welcome to another issue of The Natural Life where I talk about everything out on the farm. I’m still writing about the garden, last week we prepped our soil and got it ready for the next phase which I’ll cover today. The plan is to get seeds in the ground this week for the start of a beautiful fall garden.

Before we start, I know everyone will have a differing opinion on most of my homestead articles especially the garden ones because there are so many ways to start a garden. Remember, your location will play a major role in how you plant, what you plant, and when you plant. You will learn what works for you through trial and error, but I’m here to give you a baseline on where to start and what works for me.
Having said that… please note: Farmer is not gifted with the talent of growing seeds indoors and transplanting seedlings into the garden. I’ve tried many times and there are so many difficulties in getting a plant to make it from a small seed inside the comfort of your home all the way to growing in the dirt outside in the elements. I have almost given up, but not quite. There still may be hope for me one day. I know alot of people start plants from seeds and transplant them out in the garden and this is a great method, because it increases your chances of having a successful crop. You save tons of money starting plants from seeds instead of buying seedlings from the nursery. So, if you are able to do this, I fucking hate you… lol, jk.
*Based on this known weakness, my method of starting a garden is to sow seeds directly into the dirt. There are some plants that do well with this method and some that do not. For the plants that do not grow up from a seed easily, Farmer MIGHT buy a seedling from the store and place in the ground if its something that Miss Farmer really wants. Other than that, if it doesn’t start from a seed on it’s own in the dirt, I don’t grow it.
Let’s Begin - Planning your garden
Now with that out of the way, let’s get onto a good method of planting. I’ve mentioned a few times that you can go to your local State Agricultural College’s website and get all kinds of good information on gardening for your area and I recommend doing that. I would specifically look for a garden guide, one that shows you an idea of what to plant on each row and what dates to start them. You can also probably fine a sample raised bed plan and calendar for your specific area. This will help you come up with a plan and get started with confidence. Here is an example garden guide that I use for my area and customize to fit my space and needs.

According to this plan, I’ll need about 10 or 11 rows. But I doubt I will actually run 10 rows of plants this fall. You will need to customize based on your space and how many mouths you are feeding. One thing to think about is crops like brocolli and cauliflower you only get one or two good yield out of each plant. Therefore, you will need several plants to make enough to feed you for a month or so. You might even think about having some extra space just for brocolli, carrots, and cauliflower just for this reason. You may decide to simply buy carrots, cauliflower, and broccoli at the farmers market or grocery store instead which isn’t a bad idea.
I usually plant things that are easy to grow, that is my one and only requirement. I haven’t had luck with broccoli, cauliflower, or carrots growing from seeds, I’m trying them one more time this season and after that I’ll probably switch to something easier to grow. I suggest you do the same anon.
One thing I really enjoy about a backyard garden is being able to eat a fresh salad whenever I want. So I’m focusing on all of the lettuce varieties this year. Romaine, iceberg, salad mixes, spinach, kale, all of it is going in the ground here in a couple days. Once you figure out what you want to plant, I would get some graph paper and draw out your rows and label each section what you want you plant. This will give you an idea of how much space you need and how much food you will get from your work.
Autist Note: Save your garden plans in a notebook so you can go back and see what worked and what didn’t. You’ll be surprised how easy you forget everything that you planted just a few weeks ago. I’m not very good at staying organized and keeping track of everything I plant, but it’s a great habit to start if you can.
One last note: Remember to plant taller plants along the northern most edge of the garden because you don’t want the tall plants to block out the sun from the shorter plants. For a winter garden, most plants are short so this shouldn’t be a problem, but in the summer time, you want your corn, okra, tomato, and any trellis plants all planted together along the north edge.
Finding Seeds
Now that you have your plants drawn out and where they go, you will need to acquire seeds. Most hardware or gardening stores have seeds which is usually where I get my seeds. However, if you plan in advance and you want to try some different varieties, I have bought many seeds online and it is really easy. I usually buy my seeds from a place called Sow True Seed. Burpee is also a really good seed supplier, either one of these websites should have everything you need or want. I’ve also gotten tons of seeds from ebay, you can find decent prices on just about any plant you want to grow.
Preparing to Sow
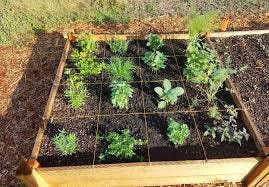
You have your seeds, now it’s time to plant right? No! lol. You have to get your dirt ready, if you are going into a raised bed, you are almost ready. You need to mark out where everything will be planted. In a raised bed its a good idea to get some string and small nails and mark out some grids. Inside these grids you will space out your seeds grouping them in the different plant types… Autism Intensifies.
To get the seeds in the dirt for a raised bed garden, just get a pencil or stick and poke small holes in the dirt and then come back and drop the seeds in. Each seed packet will tell you the depth, spacing, and row spacing. Follow this to a T!
You’ll notice on these winter crops, the seeds are tiny! It’s really hard to get just one seed in the hole, and it’s hard to even know if the seeds are getting where they are supposed to. Just do your best and try to get some seeds in each hole. When the seeds start to sprout you will wait a couple of weeks and remove the weakest looking ones so that they are properly spaced. I would use scissors to cut the weak plants off at ground level so that you don’t damage the roots.
After you get your seeds of one crop planted in the row, you are going to want to seal the seed packet up and keep the remaining seeds for next time. Don’t feel tempted to plant all of the seeds like me. This will result in way too many plants that you don’t need. If you over plant your garden, you will end up overwhelmed at the amount of work you have made for yourself. Stick to the plan!
If you are planting seedlings that you bought at the store, or you started from seeds, you will follow the same guideline above just dig a bigger hole and place the plant in the location you had planned out. Super easy!
Lastly, please use some type of marker to tell you what you planted and where. I use these crop labels from Burpee and they work great. It’s important to label where you planted all the seeds so that you can tell what is what a couple weeks later when everything starts to come up. You will look like a Level 5 Turbo Garden Autist when people come to admire your backyard masterpiece. Planting the seeds and labeling everything is a very tedious job, and will require a few hours. Make sure you take your time and get this done right, it’s important.
After you plant your seeds just cover them up with dirt and pack it down lightly. Over the next few weeks, you want to make sure the dirt stays moist, but not soaked. Immediately after planting lightly water the area, making sure the soil gets packed down fairly tight and thoroughly wet. Then depending on the amount of sunlight your garden gets you will want to water daily. Just keep an eye on the soil, if you can stick a finger in the dirt and it’s dry, it needs water. If the dirt looks wet, don’t water it. After your seeds sprout and about two weeks go by, you can stick to a water every other day schedule, or when needed. You can also get timed sprinklers for your raised beds, I can help you figure these out if you need help. Your first garden should probably stick to manual watering just to keep you paying attention to your plants.
Seed Starting - Large Row Garden
If you are planning a large back yard garden using rows, you will want to get the rows formed before you add seeds. I use a row hipper like this, and I’ll be showing some video of it in action on twitter soon. I pull this behind a tractor and it draws the row up and leaves a nice flat spot to put the seeds. If you don’t have equipment to draw the rows, get out your gloves and your old girl Miss Hoe and get after it. Great exercise!

After you get your rows drawn up, it’s pretty much the same steps as the raised bed instructions. We’ll cover the next steps in the following weeks.
Until then anon, remember, We All Gone Make It! I’ll holler at ya’ll later.
Your Fren,
Farmer