


Guest Post - Fruit Tree Orchards
By BowTied Bumpkin

Hello Everyone
I was planning to plant my garden easter weekend, but it’s very wet around my place so I need to wait a couple more weeks. If you’re in the north it’s probably still snow on the ground, lol.
So, today we’re taking a break from the garden to learn about orchards. We have a very special friend who was kind enough to share his method of planting and growing fruit orchards. This is important information because fruit is one of the best natural snacks you can eat. If you can grow your own fruit, you’ll never go hungry!
So let’s get to it, this post was written by a member of the BowTied jungle @bowtiedbumpkin. I’m glad I met him on twitter because he’s a fellow homesteader and knows his stuff when it comes to growing food. Please be sure to follow him!
Farmer’s Store
Please check out my Farm Store if you haven’t already. Use discount code Honey at check out for 5% all honey sizes! Getchu Some!
High Mowing Organic Seeds Affiliate Link
Affiliate partner with a huge selection of organic seeds.
Nature Hills Affiliate Link
Check out this affiliate link for a wide selection of trees for your property. I will do a substack on Fruit Trees soon!
“The best time to plant a tree was 20 years ago. The second best time is now.”
Chinese proverb I saw on twitter once
The ultimate sovereign individual can produce their own food & water.
In addition to veggie gardens and animals protein like eggs, fruit trees are a fantastic component to personal food secure. Better yet, planting them is a great workout and they seriously beautify your yard.
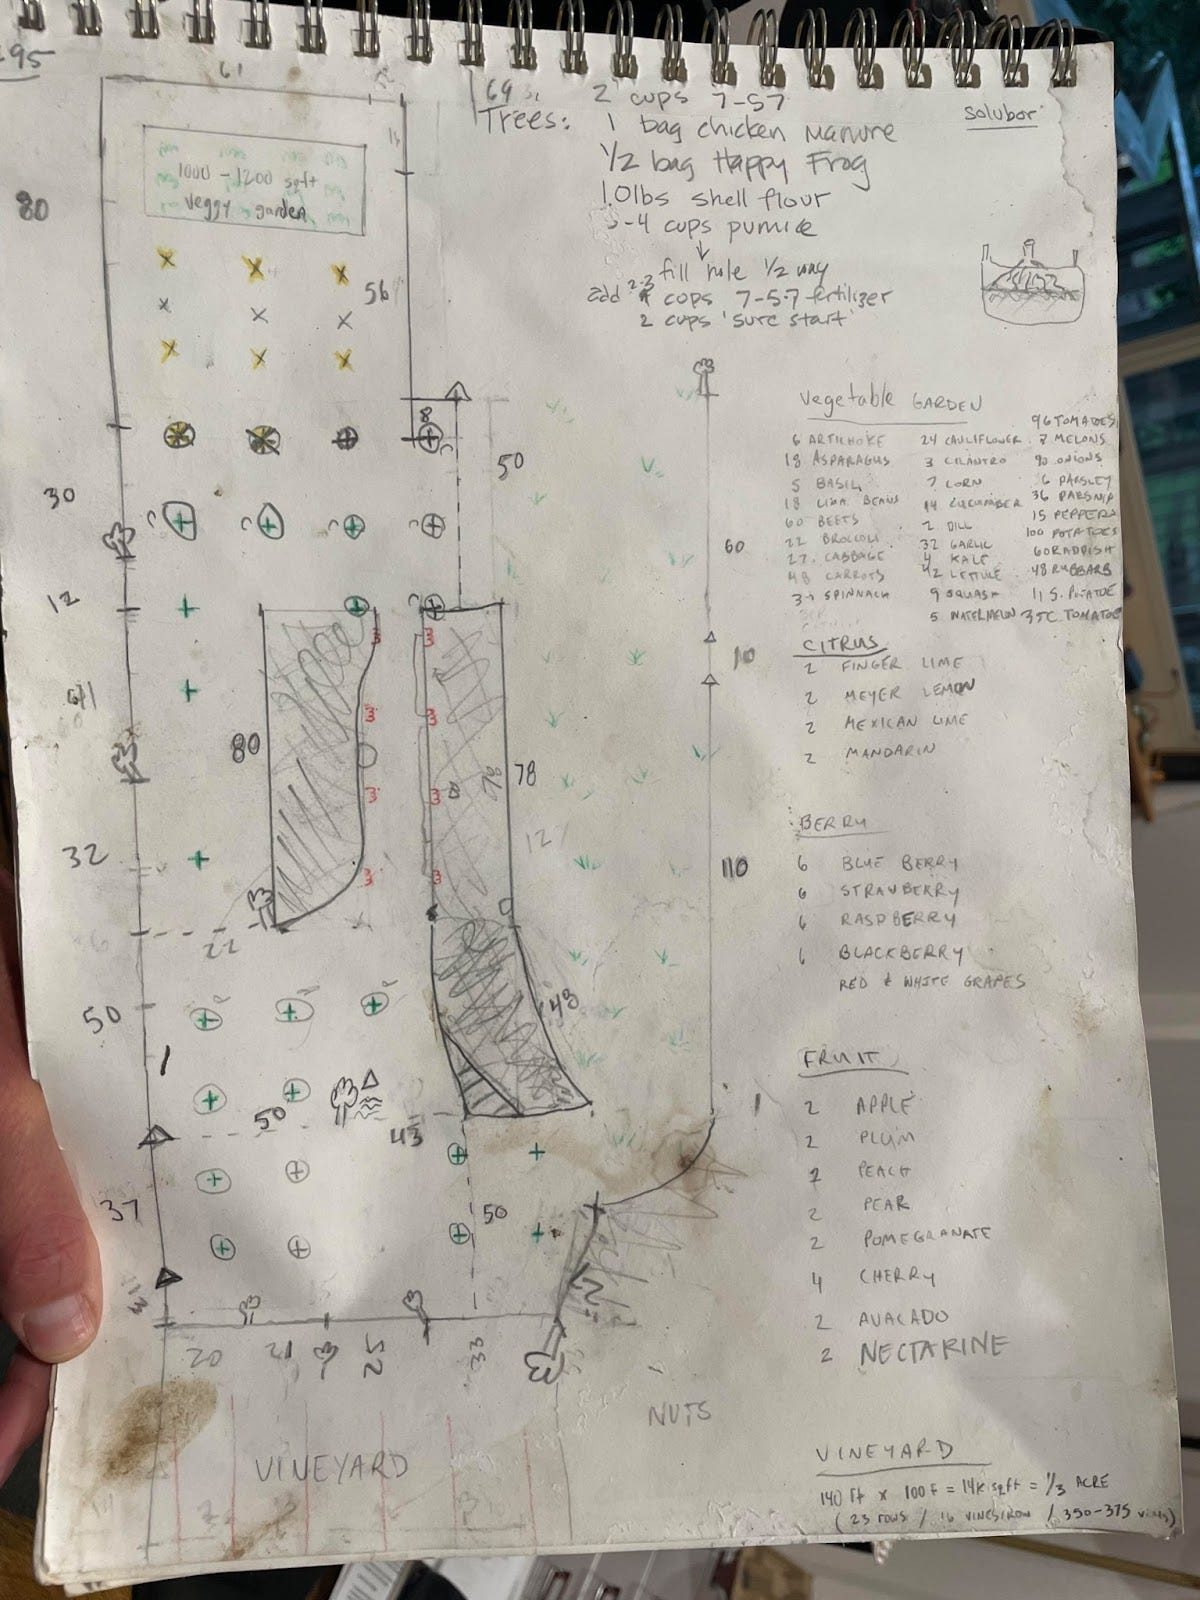
In a world of 2.2%, no wait 8.5%, no wait…. 20-30% inflation, fruit tree’s also make a great investment, producing decades of free food for you and your family with minimal upfront investment. So here are the lessons I learned planting a ½ acre orchard with 30 fruit, 12 citrus, & 30 berries.
WAGMI
Picking a spot for your trees
Obviously, trees need sun to grow & make fruit.
Pick a spot that is open with the most sun exposure possible through the day.
The less obvious but arguably most important consideration for fruit trees is drainage.
You can always amend soil if the spot you select is sandy, rocky, clay, etc.
You can’t drain a natural spring.
When you get started, dig a pilot hole or two and watch to see if they fill with water.
Better yet, leave the holes open until a rainy day & see if they flood with water that doesn’t drain for 24 hours or more. If that happens, your soil will be too damp and it will rot your tree roots, so you have to find a spot that drains and doesn’t flood an empty hole.
Lay it out
Once you’ve found a good patch of soil that drains well, you need to get dimensions of the planting space & lay out the tree zones. You are trying to space the trees 15-20 feet apart. Seems like a lot, but at the end of the day, these trees get a lot bigger and you don’t want their roots cramping each other or their large foliage shading the plant beside it.
Ideally, lay out trees in long straight lines so you can run irrigation easily. Not to mention, picking is easier in rows and straight lines just look better.
Fencing the perimeter
If you have deer, FENCE FENCE FENCE. My god they are smart, they are strong, and they will RUIN your orchard. I have spent many mornings, naked, running through my orchard trying to flush out deer that broke in. Or woke to find the entire foliage and buds of my newly planted crop eaten. A new tree can handle this once, maybe twice, before it simply can’t recover and it will die. You must fence to protect your orchard from nature.
Best fence you can do - 8 feet tall, 2 inch diameter redwood or cedar round posts. Drive them in 1-2 feet deep every 10 feet. And then put this plastic net fence up with tie wraps on each post.
Picking out trees
Every area has a Plant Hardiness Zone. Learn yours and pick trees that thrive in your zone. If you don’t, your going to spend a lot of time covering and uncovering trees during frost, and likely growing a bunch of trees that never fruit. Luckily, most tree nurseries are going to stock plants that work for their region, and they include the “Plant Hardiness Zone #” on the tag of each tree. Pay attention to this when shopping and ask a store associate if you’re unsure.
Other than this, pick the fruit you love. And then research whether those trees are self-pollinating or self-incompatible. Some trees, you plop in the ground and they pollinate themselves. But others depend on different varieties of trees in close proximity to produce fruit. Don’t worry - this info is easy to find online or from your local expert, and it just means you need more trees and get more fruit :)
Bare root or established
I’m a bare root fundamentalist.
I have planted many established 2-3 year old trees. They look better on day one… but they NEVER do as well in the long run compared to a tree that is 1 year or younger planted bare root. You may plant established trees later in your orchard’s life. For example, a couple years in, you may lose a few trees to deer or pests, so you want to backfill with a more established tree that’s on the same irrigation cycle as your existing crop. Fine. But don’t try to short cut fruit growing by planting established trees. They will produce less fruit in the long run.
The disadvantage to planting young, bare-root trees is that they don’t produce fruit in the first two years… if they do, you have to nip-it-in-the-bud as soon as you see it. This is a heart breaking experience, seeing your first peaches come on a 1 year old bare root tree and having to pick them off before they can ripen. But this is essential for healthy root growth. My mentor once said a bare root producing fruit is like a teenager having a baby… they can do it… but they aren’t established enough to take care of it and you’d rather they spend the energy setting up roots so when they do have babies, they can take better care of them. Couldn’t be more true.
Digging the holes
Alright, so you’ve got a location, you’ve laid it out, and you’ve picked your trees. Now it’s time to dig the holes. This is my favorite part. Exhausting but so rewarding once you’re done!
Rule of thumb on depth, dig them deep enough that the root bulb of your tree is fully underground, but the root graft is above the soil by +2 inches. The root graft is the kink part of this tree in this picture:
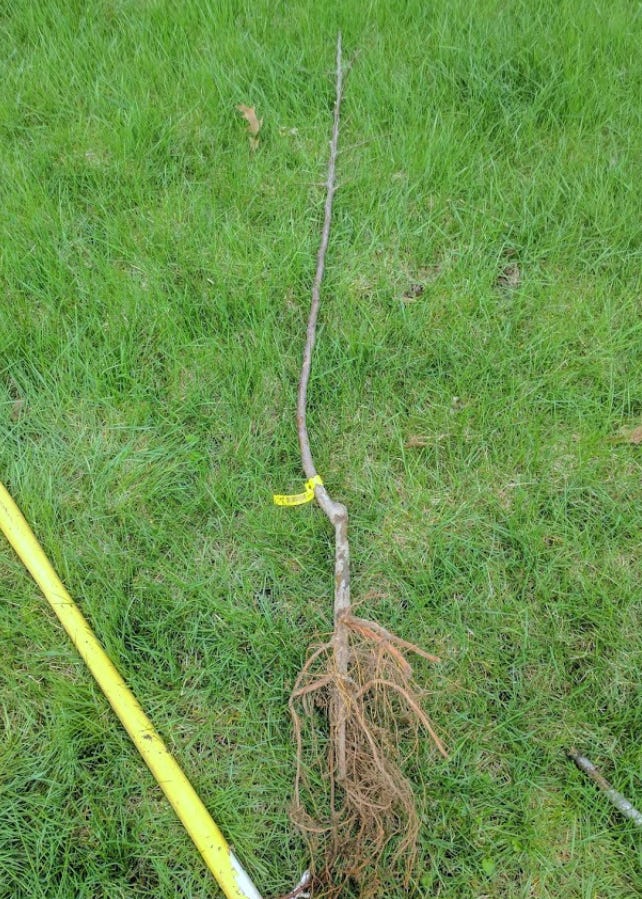
Image Source: https://misssmartyplants.com
It’s key you keep that graft above the earth… I won’t get into the science of it (cause I dont know it) but basically, the roots on your tree were selected for their ability to fight off pests & disease in the ground. The stock that is grafted onto those roots was not. So if you burry the grant below the soil line, the stock is now exposed to illness it can’t fight off & it can die.
Rule of thumb on width - go +3X the size of the root bulb. This sounds like a lot, but the roots need space to establish and grow in the soft soil you dug up before they face the dense, undisturbed soil surrounding them. The more space you can give them as a nursery to establish, the better.
You are going to be digging deeper holes than you expect. When in doubt, always over-dig. Nothing bad happens with a hole that is too big. But a hole that is too small can cramp the roots and kill the tree.
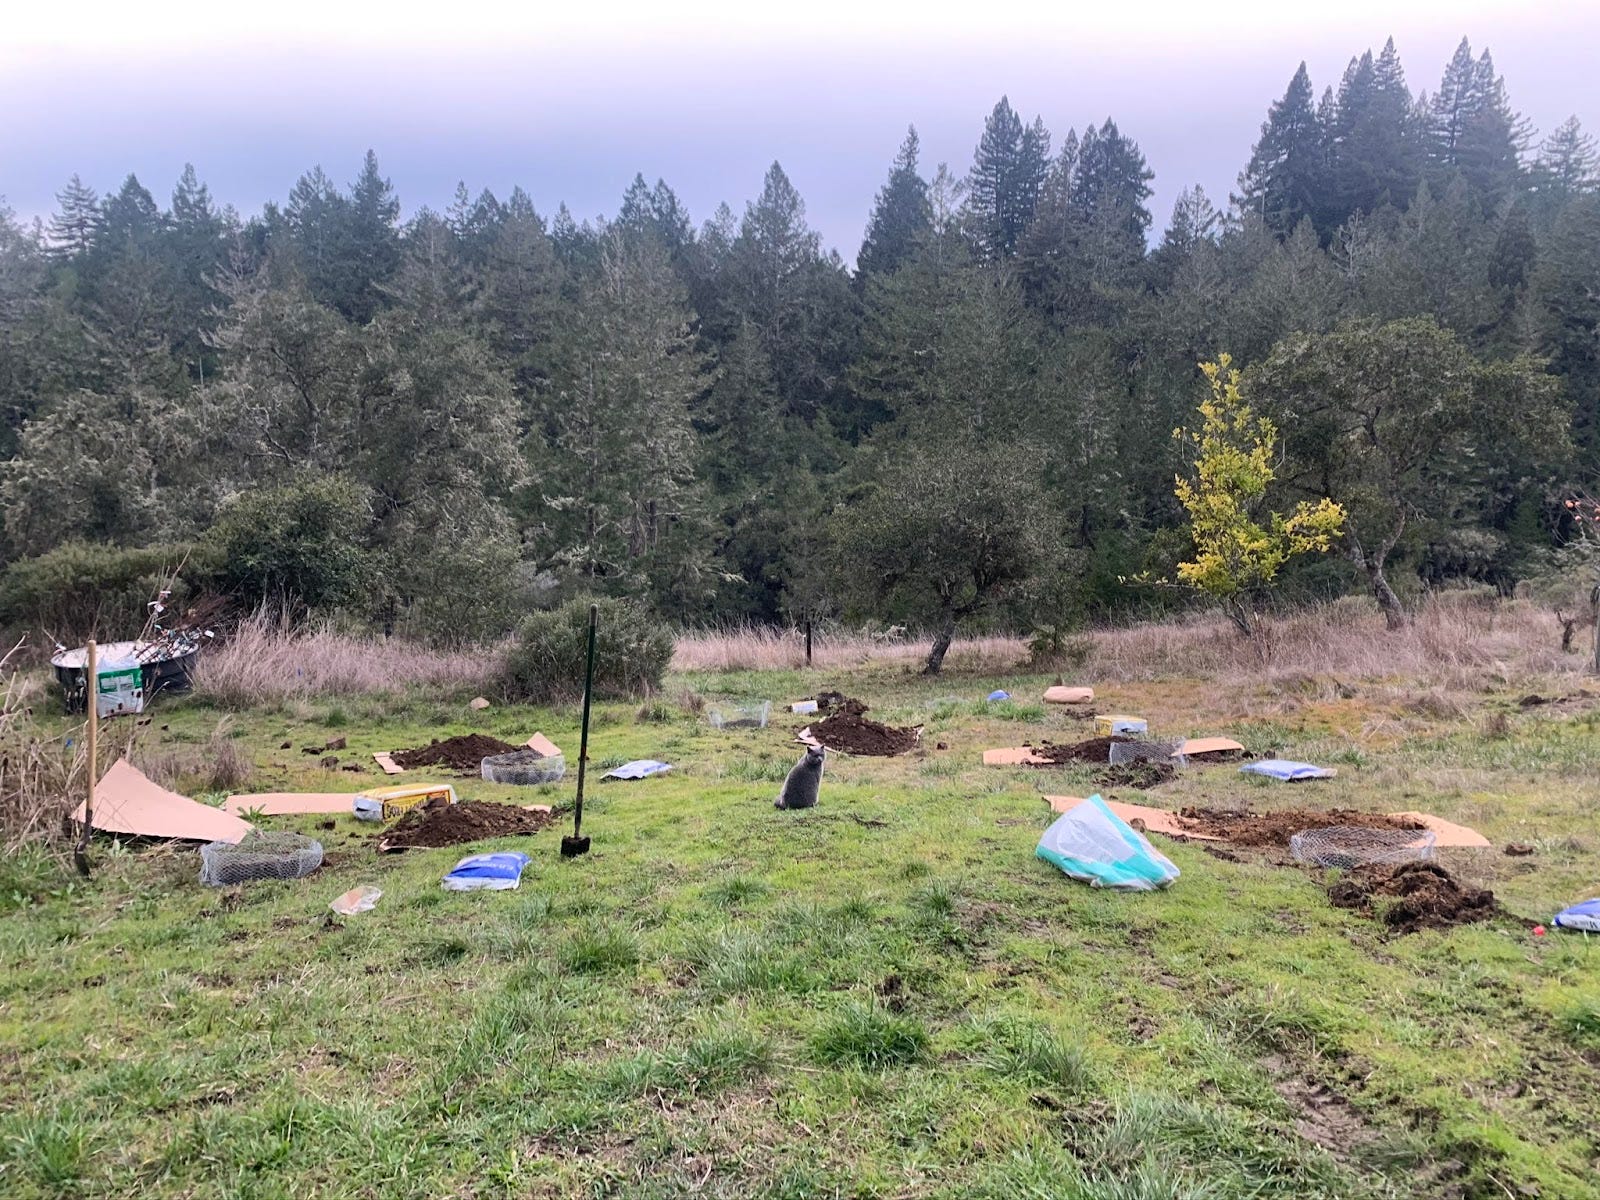
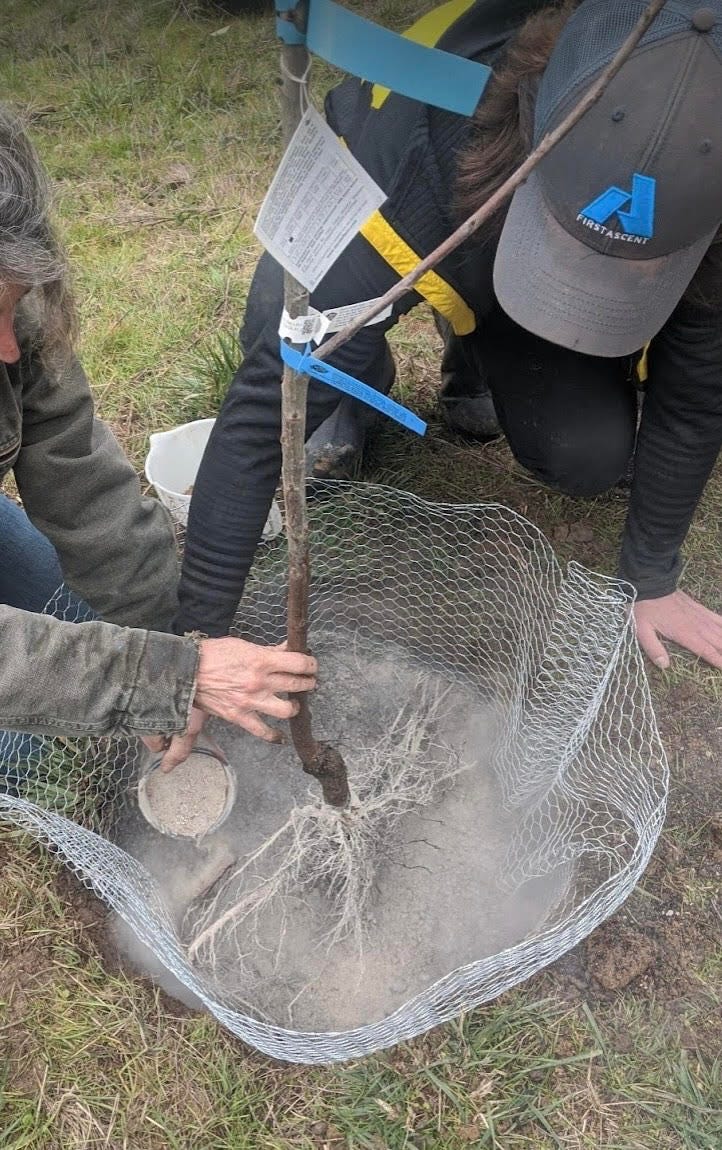
Line each hole w/ gopher wire
Protect the root bulb at all costs. This means lining the hole with gopher wire. You can make your own baskets like this, or you can buy pre-built ones. Either work. Just make sure they are the right size for your hole & make sure your hole is deep enough that they protrude above the soil line by 4-6 inches or the gophers can get over and dig into / eat your roots.
Filling the holes & soil amendments
Everything you read will say “don’t amend your soil, let the plant establish in the soil it will grow in the rest of it’s life”. You can get away with this… and there is some wisdom in this… but I believe this is like saying “don’t take supplements! Just live with the nutrient quality of the food you have around you”.
You can live off just the food around you. But you can seriously optimize your health if responsibly balanced with a healthy diet. So just like supplements, you want to add some amendments to the soil you dug out before backfilling it over our tree. This ensures that the plant is exposed to the natural soil it will encounter later in life, while also giving it the nutrients it needs to start life with optimal health.
If you want to get serious, take a soil sample and send to a soil lab. They can recommend precise levels of nitrogen, phosphorus and potassium to amend for your soil. This is overkill if your not growing large volumes, but basically your trying to get an optimum level of N-P-K. I take half the soil I dug out, and I add 1 bag of chicken manure, ½ bag of happy frog fertilizer, 10lbs of shell flour, 3-4 cups of pumice (for aeration/drainage) and 2 cups of 7-5-7 fertilizer,
For berries, drop the oyster shell (calcium) and add peat moss. This is because they love acid soils and oyster shell is base, while peat moss is acid.
Mix it all up on a piece of cardboard or a tarp. This is going to make it A LOT easier to get the mixture in the hole when you’re backfilling. It’s a bitch to do off straight grass.
Placing the tree
You’re ready to place the tree in the hole and backfill this soil amendment you mixed.
First thing I do is put a few inches of the soil mix into the bottom of the hole. This ensures the tree roots are resting on some cushion of soft, nutrient soil.
I then add Sure Start to the root ball. This is AMAZING stuff. Plaster it all over the root ball and even put a bit on soil where the tree will sit. This RAPIDLY increases the speed your soil will grow into their surrounding & establish a healthy root structure.
Place the tree in the hole. Make sure the roots are fully below the soil line. Make sure the ‘cut’ of the root graft is facing AWAY from the sun (apparently it can burn). And make sure it is protruding at least 2 inches above the soil line (see above).
Now, backfill all the soil around your tree, and be sure to compact the soil real good. You don’t want any air pockets or the roots wont grow into those pockets and you wont get a healthy growth. Once you’re fully covered, take a few light steps around the tree to compact the soil further.
Finally, water the tree immediately. Pour 2-5 gallons of water to soak the tree and give the roots a good start. This also helps to compact the soil.
Irrigation
Alright, you’ve planted the orchard. The last thing to consider is watering. I don’t believe you can over invest in a good irrigation system, so I go a little crazy. But if you’re in a very wet area, or you have few trees near a hose bib, you can probably do more manual watering.
I trenched irrigation lines with ¾ inch PVC pipes, drip lines to every tree, and invested in an irrigation automation system to take care of irrigation for me. I can write another substack on this if people are keen, but for now, let’s end here.
Congrats
You’ve got yourself an orchard! This is one of the most rewarding yard efforts you can take on. The first couple of years will be slow… but years 3 and beyond will be incredibly special. The beauty of a blooming orchard, the taste of fresh home grown fruit, the harmony you find with nature… it’s a glorious investment and I hope you find it as rewarding as I did. Hit me up with any comments, questions or feedback. Orchards are a huge process of trial, error & learning, so I’m always eager to hear your best practices.
Well there you have it! Thanks so much Bumpkin for taking the time to put this down for us to learn.
If anyone has alpha about gardening, homesteading, raising animals, or anything else, please let me know so you can share it here! I’m always looking to get different methods and techniques and making them accessible here. First hand knowledge from a trusted source is always the best way to learn.
See ya’ll next week,
WAGMI
Farmer
If/when I buy some land I was thinking of having a small orchard. This is a big help.