


Build your own raised bed garden now...
A Step By Step How-To

Welcome Farmanons,
Today I was planning to go deep into the wild world of Biodynamic Agriculture. I want to try to figure out/explain some of the ideas behind the Lunar and Cosmic Calendars for gardening so that I can decide if I think it’s a total psyop or not. However, that is a very deep rabbit hole that I’ll have to tackle in a later post.
Lately, I’ve been thinking alot about what I’m trying to do here, and I keep coming back to the idea behind “The Natural Life”. I’m still just passionate about sparking a flame in others to try to get outside and grow something.
I was going back through some old articles and decided to share this one again, it’s a solid write up on raised bed gardening.
Now is a great time to start planning and building some raised beds for the spring so I think it’s a great read for anyone interested.
I’ve noticed the “food shortage” doom and gloom on twitter has subsided lately, however, whey protien prices are at all time highs.


I still think this winter could cause supply chain issues where we at least see rising costs, if not shortages on some items.
Not to mention, all of the chemicals that are in our food supply these days.


These two reasons alone, should have you interested in learning the basics of gardening.
What better way to do that then to build a small raised bed to start your journey?
Honey shelf life is almost indefinite if stored in a warm area of your house. It’s a great substitute to regular sugar, and other synthetic sweeteners.


Grab you one (or 5) pint size squeeze jars for on the go. Great for the gym bag!
Now with a new, no mess, no drip cap!

Begin Repost:
Introduction
Hello gardening enthusiasts. I am BowTiedGarden.
I was raised in a major US city and considered myself an urban gardener. My yard was a 10x10 concrete slab surrounded by old cinder block walls. I utilized many of the small space gardening techniques as recommended by Scapegoat.
They worked very well for me in the city and still work in the burbs. Container planting compliments raised bed planting.
Ultimately, I left the city with my family and we moved to a small town. I now had a much larger back yard and a small front yard.
My urban gardening methods were still useful to my new space; however, I knew that I had to properly use the area to get the maximum return for my time spent in the yard.
The soil in the yard was of a heavy clay type soil. Farmer did a soil post a while back so please read that to familiarize yourself about soil basics. Flowers and ornamental plants would occupy one side and food the other side.
I was accustomed to using my planters and pots but figured there was probably a better method for growing food. I did some reading and decided to use raised planting beds for this task.
Raised planting beds can be made or purchased. They come in all types of sizes, designs, and material compositions. You can buy them from big box stores, online stores and small mom & pop gardening centers.
I chose to build my raised beds. Before you decide which choice to make, you must first have a plan. It is vitally important to properly layout your raised bed locations in your yard.
The Layout
I used a measuring tape to get a rough idea of the dimensions of the yard and used graph paper to provide a good idea of the square footage. Depending on the size of your yard, you may not need to do this.
If you have a half acre and only want to build raised beds in a specific spot, just plan for that area. My yard is much smaller than a half acre and it was easy to measure.
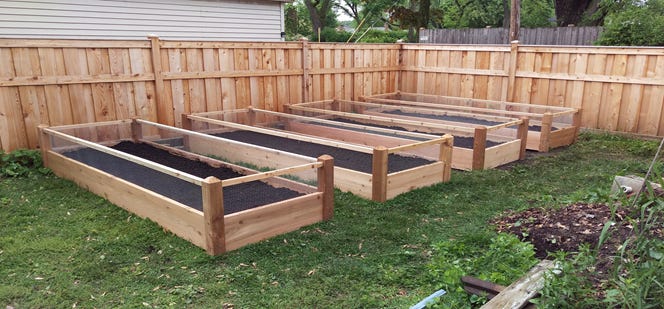
I plotted the locations for my two raised beds. It’s important to plan for the space necessary to walk around the raised beds. Building a raised bed with no room to walk around can become a chore.
Weeds will grow easily in those areas because it can’t be properly managed. If you are a bit older, the lack of clearance will equal back pain. Plan for your raised beds to have at least two feet of clearance all the way around.
I would have spaced these beds slightly further apart and also a bit further away from the fence. The ideal spacing is enough room to get a lawnmower through.
Grass takes a lot of maintenance. My yard is small enough that I replaced all of the grass with other plants and natural products. You can get away with a smaller space in between the beds if you don’t have to mow it.

Notice the spacing between these raised beds. Easy to navigate between and around.
Design
Raised beds come in a variety of materials and designs. They are easily purchased online, at big box retailers, and at small mom & pop gardening centers. You can make raised beds out of stone as well.
Typically, you will not be able to buy stone raised beds. The most common raised beds for sale will be:
1. Wood (usually cedar)

2. Plastic/Vinyl/PVC type material

3. Metal

Your choice of material mostly depends on what aesthetic you prefer. Local climate and weather patterns may also play a role in material selection. All of the above images are from Amazon.
These raised beds can be found nearly anywhere in the US. The above designs are pictured with vegetables and fruit bearing plants.
Raised beds may also be used for flowers and the design ideas are limitless.
Construction
It’s easy to order a prefab raised bed and assemble it. I chose to build them as a project with my children. A raised bed can be built from cedar with zero trade experience and only one tool is necessary.
Stone block raised beds require no tools at all. Please note: I am only referring to the construction.
For any type of gardening you will need the basics. Farmer covered the normal tools required for yard work.
Cedar is a great choice for raised bed construction for a few reasons. It is very weather resistant and durable; rot resistant; non toxic and free of chemicals; and a natural insect repellent (bugs don’t usually eat it).
For growing food use cedar. Treated woods can leech chemicals into the soil and plants.
For flower beds, treated wood is an option but I still prefers cedar.
This guide will cover the construction of a very basic 4’x8’x1’ cedar raised bed.
Please note: eye protection, gloves and other ppe should be a part of any home project.
Tools required:
1 Drill (corded or battery)
Supplies:
Six 2x6x8 cedar planks
One 4x4x4 cedar post
Two boxes of 2.5” coated deck screws (comes with star drive drill bit)
One 3/32 drill bit for pilot holes (about 2.5 inches long)
Before you check out of the store with the wood planks, have it cut to size there by a store employee. Cut two 2x6x8 planks in half so that you have four 2x6x4 planks. Then have the 4x4x4 post cut down into four equal posts so that you have four 4x4x1 posts.
Everyone has their own methods for joining wood. I did some projects with my pop as a kid and had a basic idea of how to create the raised beds. However, I also watched a handful of videos on the subject to refresh my memory.
You can reference this site https://www.almanac.com/content/how-build-raised-garden-bed for more detailed instructions. I didn’t have many tools available so I eyeballed everything. My beds lasted a long time.
Line up one layer of planks roughly on a flat surface into the shape of a rectangle. If you have a partner to help hold the planks steady, it makes the job easier.
You can also simply use a curb, fence, brick wall or other hard, slightly elevated surface to act as a stop. Once in its rough outline shape, hold the joint together and drill two pilot holes at each joint about 1 inch from each end using the 3/32 bit.
The pilot hole should penetrate both pieces of wood. Pilot holes help prevent the wood from splitting when screwing them together. This should equate to 8 pilot holes in total.
Repeat this process for the 2nd layer. Now equip the star drill bit and use the deck screws to connect the individual planks together. At this point, you’ll have two 4’x8’x6” bed frames.
Stack those frames on top of each other. In the corners, one at a time, line up a 4”x4”x1’ post even with the bottom plank. Drill two pilot holes in each layer of the bed.
Each corner should have 8 pilot holes. Then switch the bit and screw the deck screws to join the planks and the post. Repeat this three more times. Your posts will jut out a little from one end.
When you place your completed raised bed in the yard, the posts will act as small feet for better stability in the earth. Your bed should look like this picture.
Once the bed is set down into its place use a shovel or trowel to create enough depth for the posts (this will only be about 2 inches). As long as the bottom of the bed is sitting on the earth all the way around, it’s good to go.
For any uneven spaces just dig or fill until mostly level. Remember, we aren’t looking for perfection as this guide is for the basics.

Soil Mixture
Before soil is added to the bed, it’s important to prep the area under the bed. If there is existing grass or a patch of dirt with weeds simply collect basic cardboard boxes throughout the year and lay them in the bed.
Alternatively, newspaper added in thick layers works as well. This will smother any grass and weeds and breakdown naturally over time. Holes must be poked into the cardboard for drainage.
You can also prep the area for the bed in the Fall by digging up the grass and tilling the earth. Cover with cardboard and leave it in place from Fall to Spring.
If pests exists in the earth, like voles and groundhogs, mesh chicken wire can be attached to the bottom of the bed to stop these critters.
Garden didn’t have that issue save for a few bunnies that were caught by the dogs. The bunnies stayed away.
As a non-autist, maths can be challenging. Square footage must be converted to cubic footage in order to determine the necessary amount of soil for the bed. The calculation is as follows:
https://www.thecalculatorsite.com/conversions/common/square-feet-cubic-feet.php
Anyway, the total amount of soil needed for this raised bed is 32 cubic feet to fill it to the top.
Do NOT fill the bed to the top. 28 to 30 cubic feet of soil will be plenty. What soil to use?
(Farmer Note: Read my detailed post on Dirt and Raised Bed Garden Soil)
- Big box store bagged soil like Miracle Grow
- Local soil and mulch company
- Make your own
Garden chooses a combo of local soil companies and making my own. Most local soil companies have various grades of soil and compost.
Request an equal mixture of garden soil and compost. It’s okay to have extra soil available. The odds are it can be put to use elsewhere in the garden.
Normally the local soil companies will deliver the soil for a small fee and dump it at a designated spot near the yard. This will comprise 66% to 75% of your bed’s soil.
The remaining 34% to 25% will be a combination of vermiculite and coconut coir (husk) or peat moss in equal parts.
Add the soil to your bed and mix in the vermiculite and coconut coir at regular intervals.
The below links explain the benefits.
https://www.thespruce.com/how-to-use-vermiculite-5089699
https://www.calblendsoils.com/benefits-of-using-coconut-husks-in-your-garden/
Square Foot Gardening
Garden learned about this process from a book and used those methods successfully. Mel Bartholomew coined the term and invented the process of square foot gardening.
You can find his books in used books stores, libraries and online. Please visit his website to dig in deeper to square foot gardening.
The TL:DR version is to break up your raised bed into 1’x1’ plots. Twine, lattice and a variety of other materials may be used to create a grid on top of the bed. Each square foot plot can handle a certain number of plants. The space uses resources more efficiently than row planting.

Raised beds paired with square foot gardening offers the ideal setup for your backyard. The ability to control the soil mixture is perhaps the single best advantage.
Raised beds are easier to manage due to the number of plants in each square foot; it’s much harder for weeds to take root. Raised beds use much less water as it’s not wasted on spillage.
The water goes directly to the plants. Garden uses a rain barrel to capture water and uses 5 gallon buckets. However, water from a hose and spigot will do just fine.
The soil in raised beds warms up more quickly in the spring for early planting. Soil amending is easy and requires no heavy commercial fertilizers; just add compost.
The drawbacks to raised beds are minimal but important to consider. There is an upfront cost in materials and time for DIY. Prefabs usually cost more to buy.
It’s worth comparing lumber prices to the prefab prices because sometimes they are similar. Once raised beds are in a location it is very difficult to move them.
The soil is more expensive. Raised beds require less water, but more frequent watering. The soil will cool more quickly in the Fall. At some point, they will break down and will need replacing.
Conclusion
Raised beds offer a number of benefits for every backyard gardener. The plants and resources are more efficiently managed and the soil can be prepared specifically for the bed.
Compost is the only amendment needed to replenish the nutrients each year. Cold frames can be added for early plantings and trellis and support structures may be used for vine plants. The corner posts can be much longer and have chain-link fencing added for critter protection.
Garden’s yard would require so much soil amending that it would cost a great deal of money for the entire yard. The best solution in this case is a raised bed.
I use a wide variety of raised beds in the yard: from small stone beds only a few inches tall; to long 1’x6’x6” boxes in rows for flowers; and larger 2’x’4x6” boxes for bushes.
A few years ago Garden’s family wanted more “pretty things” in the yard. I repurposed the existing raised beds and had some landscaping done (a patio).
A dwarf cherry tree and dwarf peach tree bear some fruit and I use containers for tomatoes, peppers, strawberries and beans. Flowers and ornamental plants take up most of the space.
Thanks for reading this post on raised beds and thanks again to Farmer for allowing me to write this for you. If you have any questions about raised beds or backyard gardening in general, please find me on twitter at https://twitter.com/BowTiedGarden
Such a detailed post on raised beds, what are you waiting on? Start now, so you’re ready for the spring planting season.
WAGMI,
Farmer
Great post, I’m creating raised bed in the next couple of weeks, ain’t got the time for anarchy gardening with the kids