


Build Your Own Fence Guide 7
How to Install Wire Fence

Welcome to all of the new subscribers! We’re almost done with our Build Your Own Fence Guide where we’re going step by step building animal fencing the right way. Stick around and look through all of my old articles to find what you’re looking for. We have many new topics to cover after this guide!
Don’t forget to start planning your fall garden now. Order seeds now, check these sites using the affiliate links below if you decide to buy seeds online. I appreciate it, I get a small commission of any qualifying purchases through these links.
Hoss Tools and Seeds - Affiliate Link
High Mowing Organic Seeds - Affiliate Link
Also, Please check out my store. 👇👇👇
How to Install Wire Fence
With the brace post assemblies done in the last article, we’re now ready to begin installing the wire fence. Let’s get started.
Begin by making sure the fence row is clear of any obstacles, this should have already been done, but do it now if needed. You also want to mow the grass down along the fence line as short as possible. Make two or three passes with the lawn mower cutting a strip about 8 feet wide with 4 feet on each side of your fence row.

Setting T-Posts
We have to set our T-Posts in a straight line along the fence row. To make sure you have a perfectly straight line, pull a string from one brace post assembly to the next one. Do this by putting a nail in the outside edge of the wooden post about 1 foot from the ground, only drive the nail in half way.

Attach the string using the following method.
Tie a string to the t-post about 1 foot off the ground using the following knot method:

Slip the loop over the nail. Now, pull the string to the next wooden brace post of your fence row. Place a nail in the vertical brace post on the outside of the fence line about a 1 above the ground and drive it in half way, just like you did before. Attach the string to the t-post and pull the string as tight as possible just like it shows in this video.👇
This string line is where your T-post will go, so you want this line perfectly straight. Make sure the string is tight and not touching anything. You may need to adjust the height of the string to avoid touching any hills along the fence row. You want the string running as close as possible to the ground without touching it any where along the line.
Driving T-post
You’ll take a stack of t-post and walk out 10 feet from the first wooden brace post assembly and drop a T-post next to the string. Walk another 10 feet and drop a T-post. Do this for the entire fence line.
Come back with the T-post driver and drive them in making sure they are directly on the string line. Also make sure the side of the t post with the bumps on it are facing toward the side of the fence your wire will be (wire fence inside the fenced-in area, t-post outside). Drive them in until the flat paddle like portion on the bottom of the t post is completely in the ground.

Once you have all of your t-post in, go back and roll up the string and remove the nails on each end. Take a torpedo level and put it up against the T-post to make sure they are straight east/west and north/south. Push on them to get them straight.
Installing Wire Fence
Unload your wire roll at one end of the fence row at the corner brace assembly. Situate the roll so that it will unroll with the red top wire farthest away from the posts. You want the fence on the inside of the T-posts. You want the roll to start just past the corner assembly so that you have at least 3 feet of extra wire to wrap around the brace post.
With the wire roll situated properly, unroll the wire on the ground, put something heavy on the end so it won’t roll back up. Walk down the fence row unrolling the wire all the way to the next brace post assembly.

Cut the wire off at the roll making sure to leave about 3 feet extra to wrap around the brace assembly.
Attaching Wire Fence to Brace Post Assemblies
Stretching wire fence correctly requires the use of a temporary brace on one end of the fence row. This temporary brace looks just like an H-brace installed just past the H-brace you’re attaching the wire to. It is used to attach two come-alongs to so that you can stretch the fence straight and tight.
Now, you need to understand exactly how the fence stretching process works.
Here is a good video showing how the dummy brace works and how to pull the fence.
Note: As you can see in the video, in order to set up the temporary brace, you will need extra room just past the H-brace assembly. Look at both ends of your fence line and pick the one with the most open space. The one with the least amount of space will be the one you will attach the wire to first.
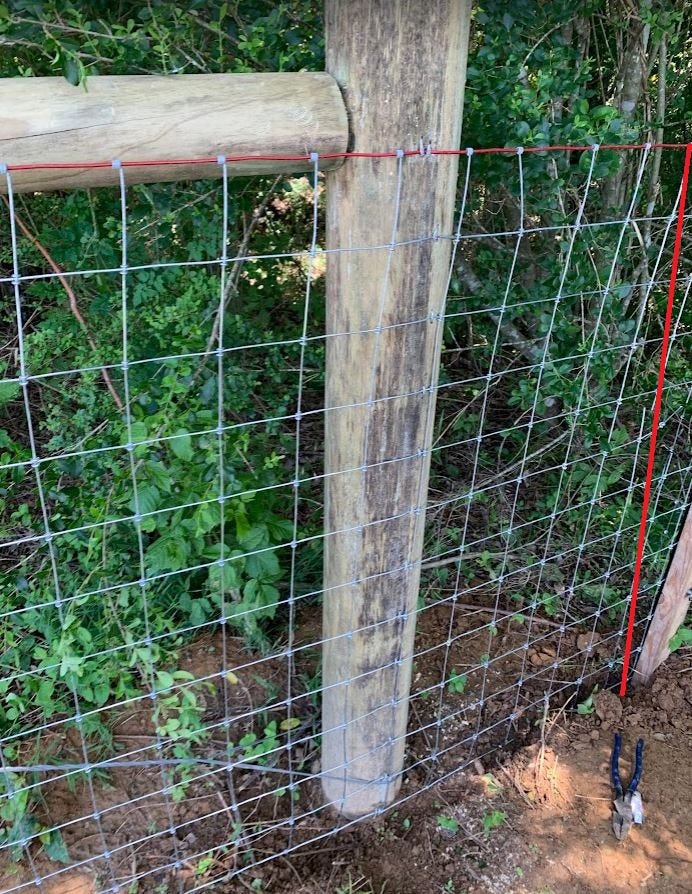
Stand the wire fence up and bring it outside of the h-brace assembly and wrap it around the corner post, making sure the wire is nice and square, cut the vertical wires back about 1 foot and pull them off of the horizontal wires, leaving you bare horizontal wires. Wrap these around the corner post and wrap them back around themselves one by one, making sure you’re wrapping them as tight as possible


Now go to the other end of the fence line and begin building a temporary brace assembly to stretch the wire tight.
Stretching the Wire Fence Tight
Measure out from the last vertical post on your h brace about 8 feet and dig a hole about 2 feet deep. Put one of the extra fence posts from your left over material in the ground. Drill a 3/8” hole in the dummy brace post that is in the new hole you just dug. Drill the hole just higher than the horizontal brace post in your permanent brace assembly.
Drill another 3/8” hole in the last vertical post in the permanent h-brace assembly you’re attaching fence to. Get an extra smaller brace post from your left over material and drill a 3/8” hole in both ends right in the center of the post. Drive a 3/8” brace pin into both ends of the post. Place the brace pins into each hole on the vertical posts you just drilled. Now you have what looks like a temporary H-brace assembly extending just past your permanent H-brace assembly that you’ll be tying wire to.
It’s a good idea to wedge a couple of scrap 2x4’s into the hole between the temporary post and the ground to keep it from moving while you stretch the fence.
(I understand this may be confusing, refer back to the video above if needed.)
Attach the wire puller to the wire fence leaving an extra 2-3 feet of fence on the end. These fence puller tools are somewhat tricky to use, you’ll put the wooden board on the ground, put the wire fence on top of it, and then put the metal keeper bar on top of the wire fence. Insert the bolts and use your battery impact driver tool to tighten the bolts as tight as as possible without damaging the fence puller tool.
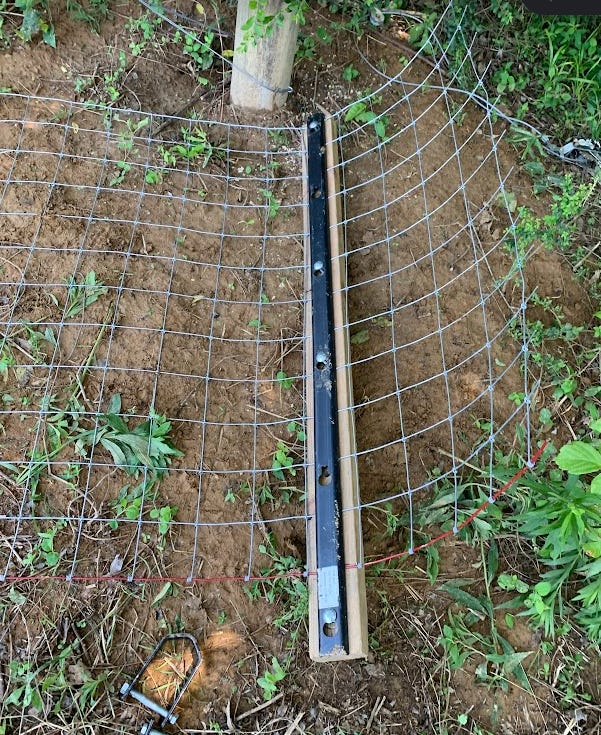
Make sure the bottom of the wire fence is at the very bottom of the fence stretcher tool.
Attach the two come-alongs with chains to the temporary brace post you built. Attach the hooks of the come along to the fence stretcher tool. Position the come-alongs one high, about the height of the fence, and the other one low, close to the ground.

Slowly tighten the fence with the come-alongs, one at a time, a little bit at a time. It’s good to have someone checking the fence along the fence row to make sure the wire fence isn’t caught anywhere.
The wire fence will tighten and slowly stand up. It’s good to get the fence nice and tight, but you don’t want to over tighten it. Once it’s stood up, you may need to walk down it and adjust it to make sure the fence is in position. You want it touching each t post.
Don’t over tighten the wire, only use one hand when cranking the come-alongs, two hands will give too much force and could damage your fence or brace assemblies.
When your fence is tight and in position along the fence row touching the t-posts, go ahead and put a few t-post clips on the t posts to hold the wire in place. You don’t have to put them all on right now though, just a few along the fence line to hold it up and in position.
Put a staple in every horizontal strand of the wire fence of both H-brace posts. You want to make sure the staples are driven in good and are holding the wire strands tightly.
Cut one strand of the fence just inside the wire puller tool. Cut the vertical wires and remove them. Wrap the wire around the post back onto it’s self as tight as possible.
Continue to cut one strand at a time, and wrap tightly around the post. Cut the top and bottom strands last. When you’re done the wire fence should still be very tight. Now that you have cut every strand of the fence, all tension is off of the come-alongs and the temporary brace. Now you can remove the dummy brace and fill the hole back in.
Go back and put four t-post clips on all of the t-posts using your fence clip tool. One at the bottom, one at the top, and two in the middle.

Congratulations, you have completed your first run of fence. Do this along every side of your fence rows to complete the project.

Now we’re ready to hang our gates and put the animals in the new pasture!
WAGMI
Farmer