


Build Your Own Fence - 3
Fencing Cost Breakdown and Pricing

Fencing Cost Breakdown and Pricing

Now that you have your fence layout sketch and your material break down, it’s time to put quantities to it. Go down your cost breakdown list and come up with the quantity for each line.
I’ve done an example cost break down for a basic layout with 4 corners and a gate so you can see how it works. There are 4 corner assemblies, 1 line post in the middle of each long fence run, and a 16’ gate with H braces on each side.
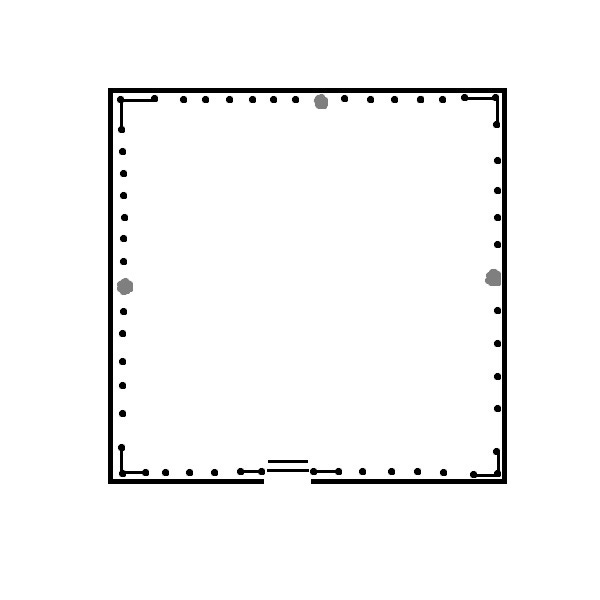
Material Breakdown
Here’s what you need for this layout.
Wooden Posts (5/6” dia. x 8’ long, treated) - 16
Concrete (if needed, at least 1 bag per post) - 20
Brace Posts (4/5” dia. x 8’ Long, Treated) - 10
T-Posts (6’ long, steel) - 40
Wooden Line Posts (4/5” dia. x 8’ Long, Treated) - 3
Woven wire 4” square goat/sheep fencing - 560’ (2 330’ rolls)
Brace pins - 16
12-1/2 gauge high tensile wire (for h braces) - 400’
Fence Staples (1-1/2” galvanized) - Large Box
Gates - 1 (16’ goat panel gate)
I made a sample cost estimate spreadsheet you can download and use below.

Take this list and add 2-3 local supply stores to call to get quotes. Fill in the prices from each supply store next to each item. I made a basic spreadsheet you can use here.
As you can see, fencing material costs are high! This same fence would have cost half this much two years ago, I know because I built one about 2 years ago and prices have almost doubled on all of the items. If you’re on the fence about building a fence, I recommended pulling the trigger now, I don’t think prices are going back to the old days.
Buying Fence Material
At this point you are ready to buy fence materials, now that we have our list with material costs from various local suppliers. You want to pick the lowest price as long as you’re sure they have good quality material.
It’s up to you whether you want to buy all of these items at once, or purchase the items as you need them. To get started you’ll only need the large 5”-6” diameter wooden posts and the concrete. The rest of the items won’t be needed for about two weeks after you set your posts.
We’ll layout, mark, and dig the holes first. You want to place the posts in the holes with concrete as soon as possible after the holes have been dug. The posts will need to set for 1-2 weeks before we move to the next phase of the process.
In this guide we’ll cover the items as we need them in the process. The next couple of weeks we’ll cover the quality aspects you should consider when purchasing your wire fencing, and other tools for the process.
Buying Quality Materials
Wooden Posts
If you’re thrifty, you can find treated wooden posts from lumber mills or logging companies that make telephone poles which are usually cheaper than the supply stores. Be careful to make sure the posts are no larger than 7” in diameter. They also must be 8’ long. The ground holes are dug to a depth of 3 feet, which will leave about 5 feet of wooden post extending out of the hole. On 4 foot goat fencing this is perfect.
You must only use 5”-7” diameter posts wooden posts for the braces and corners. So your hole needs to be 12” in diameter. This gives you plenty of room to adjust the post. It also leaves plenty of room to back fill with dirt and concrete. If you don’t use concrete, you must “tamp” dirt and rock into the hole around the posts very tight every 3 inches when backfilling. It helps to have plenty of extra room in the hole for tamping.
Its important to note the bigger the posts, the bigger the hole you need to dig. If you are digging by hand, this adds extra work. Post’s bigger than 7” are much heavier, which adds to your effort. Trust me, I’ve placed large cheap posts and regretted it.
I’ve also tamped material around posts and I do not recommend it for building goat fence. Goat fence requires a considerable amount of tension for it to be installed properly and look good for years. The amount of tension placed on the fence will stress your wooden brace post assemblies. The stress will cause them to move without properly back filled holes or weak/cheap/skinny posts. For this reason, I strongly recommend using plenty of concrete in your post holes, and properly sized, good quality posts.

Also, whatever you do, make sure your posts are treated or made out of the right type of wood. Here is a list of different post materials and their lifespan capabilities:

Concrete
I highly recommend back filling your post holes with concrete. Depending on your location, this may not be necessary. In my area, the dirt is mostly clay and it just doesn’t hold a post very strong.
Any of your standard pre-mix concrete bags should be fine. I would opt for at least one 80 pound bag of concrete per hole. This step cannot be over done in my opinion. More concrete in the hole is better than not enough because you want strong posts that hold for many years.
Based on the information provided, you should be ready and able to purchase your wooden posts and concrete to begin your fence project. The next step is layout/digging post holes and get ready to come back and set the posts soon after.
See you soon!
WAGMI
Farmer